A little while ago our web developer asked me to look into proxmox containers and how we could take advantage of it to setup a development environment for him. The idea was to use the power of linux containers and enable him to develop fully functional/accessible sites in a private container. Here are the steps we will cover in this article:
- Install proxmox on a machine with a single public IP address
- Secure the machine with ufw to only allow connections from a specific IP address space
- Setup a admin user other than root for proxmox admin interface
- Setup proxmox to use the single IP address and the vmbridge for masquerading
- Setup two Linux Ubuntu 12.04 containers with private addresses and enable the to access the internet via the bridge
- Setup Apache on the proxmox host and configure it to do reverse proxy for the two ubuntu containers
- Setup DNS (for the container instances) to point to proxmox host and test to make sure the “private” containers are accessible from Internet
- Tighten up security on the reverse proxy on the proxmox host
- Optionally only allow access to the proxy from specific IP address space
To do all this you need to download proxmox ISO file and burn it to a CD. Go through the installation of proxmox and set up the “host” with the single pubic IP address. This is simple enough so I’m not gonna cover it here. Once you have this setup you should be able to point your browser at the IP address (https://aaa.bbb.ccc.ddd:8006). NOTE: I will use aaa.bbb.ccc.ddd as the representation of the publicly available IP throughout.
Next we need to secure access to the host to only allow connections from a specific IP address space. In my case that’s the University network — 141.117.0.0/16 — this is optional. We need to make sure ufw is installed. We also need to make sure ufw is allowing incoming connections by default and then block everything except access from the University network:
ufw default allow incoming
ufw allow proto tcp from 141.117.0.0/16 to any port 8006
ufw deny proto tcp from any to any port 8006
ufw allow proto tcp from 141.117.0.0/16 to any port 3128
ufw deny proto tcp from any to any port 3128
ufw allow proto tcp from 141.117.0.0/16 to any port 111
ufw deny proto tcp from any to any port 111
ufw allow proto tcp from 141.117.0.0/16 to any port 22
ufw deny proto tcp from any to any port 22
ufw enable
Note that I’m assuming your ssh connection to the host is via the University network (141.117.0.0/16). Make adjustments to this if it’s not, otherwise you might lock yourself out. These basic rules will plug all the holes accessible publicly and only allow connections from our University network (141.117.0.0/16).
Setting up users in proxmox is a bit weird. You have to add a regular Unix user to the proxmox host environment and then add the user to proxmox later and give it permissions and roles. Here I will use a user “myadmin” to create something for our web developer to use.
useradd -m -s /bin/bash -U -G sudo myadminThis will create a account “myadmin”, join it to primary group “myadmin”, assign it /bin/bash as shell and make it part of the group “sudo” — which will allow the user to use the sudo command in the future. Next on the proxmox web interface we need to create a Admin group called “Admin”. In the proxmox interface we click on the Datacentre in the left pane and go to Groups and click the Create button. Call the group “Admin”. Now go to Permissions tab in the right pane. We need to create a Administrator Group Permission to assign to our “Admin” group. Click Add Group Permission (right below the tabs in this pane) and fill it in like below:
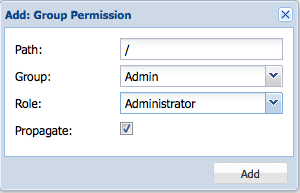
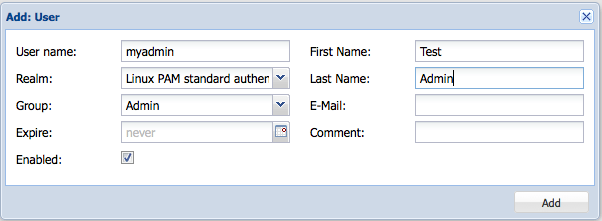
In this window the path: / means the entire Datacentre (including the host and the containers/VM’s). You might want to adjust this. The Role “Administrator” is a predefined role that is pretty much the same as root. Now that our group “Admin” has the “Administrator” role for the entire Datacentre, we want to make the user “myadmin” — which is a unix account right now — be part of that, effectively creating another “root” account for our web developer. So back to the Users tab we click Add and create our new user (really just add the Unix user to proxmox):
Okay, so now test and make sure you can access the host via ssh using myadmin as user, also make sure you can sudo to root on the host and check the web interface and ensure the myadmin account can login and see all the goodies in the data centre. Otherwise stop and fix.
At this point login/ssh to the host as root or myadmin (plus “sudo -i” to become root). We need to modify the networking config in /etc/network/interfaces to setup all the masquerading jazz. Make a back up of your interfaces file first and note the public IP address that is in there (I’m gonna use aaa.bbb.ccc.ddd as my public address here). Once you have a backup replace everything in the file with the following:
auto lo
iface lo inet loopback

auto eth0
iface eth0 inet static
        address  aaa.bbb.ccc.ddd
        netmask  255.255.255.0
        gateway  aaa.bbb.ccc.xxx

auto vmbr0
iface vmbr0 inet static
	address 10.10.10.1
	netmask 255.255.255.0
	bridge_ports none
	bridge_stp off
	bridge_fd 0

        post-up echo 1 > /proc/sys/net/ipv4/ip_forward
        post-up   iptables -t nat -A POSTROUTING -s '10.10.10.0/24' -o eth0 -j MASQUERADE
	post-up   iptables -A FORWARD -s '10.10.10.0/24' -o eth0 -j ACCEPT
	post-up   iptables -A FORWARD -d '10.10.10.0/24' -m state --state ESTABLISHED,RELATED -i eth0 -j ACCEPT
        post-down iptables -t nat -D POSTROUTING -s '10.10.10.0/24' -o eth0 -j MASQUERADE
	post-down iptables -D FORWARD -s '10.10.10.0/24' -o eth0 -j ACCEPT
	post-down iptables -D FORWARD -d '10.10.10.0/24' -m state --state ESTABLISHED,RELATED -i eth0 -j ACCEPT
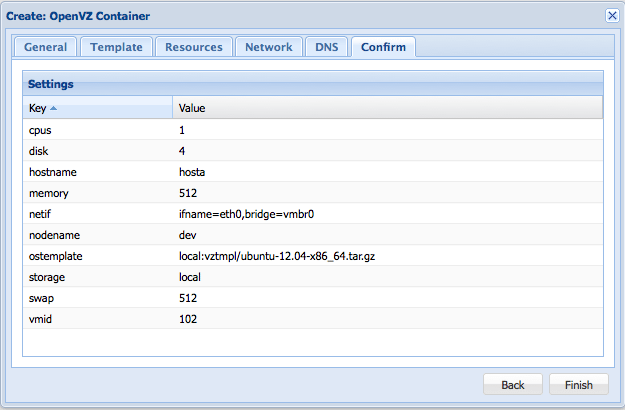
So in the above I’m creating a separate private network (10.10.10.0/24) behind the publicly available IP address aaa.bbb.ccc.ddd and am doing some iptables commands to setup masquerading. This is sorta like setting up a home router to share a publicly available IP address you have at home. Once this is in place reboot the host and make sure you can log back into https://aaa.bbb.ccc.ddd:8006/ and get the proxmox interface. If you’re good to go, as next step spin off two Ubuntu containers (I won’t go into details on this…..lots of docs out there for this). Your OperVZ Container confirmation screen should look something like this:
The only really important thing here is that you setup the networking under Network tab as Bridged mode and select vmbr0 as your bridge. Once that’s done ssh back to your host (aaa.bbb.ccc.ddd). Assuming you have two containers 100 and 101, enter one of them by using the vzctl command:
vzctl enter 100
Once inside the container you need to setup the networking. Again the file here is /etc/network/interfaces (assuming you’re container is Ubuntu/Debian flavoured). Backup this file first and replace the content with the following:
# interfaces(5) file used by ifup(8) and ifdown(8)
auto lo
iface lo inet loopback

auto eth0
#iface eth0 inet dhcp
iface eth0 inet static
        address  10.10.10.2
        netmask  255.255.255.0
        gateway  10.10.10.1
        dns-nameservers 8.8.8.8
        fns-search      your.real.domain.name.com
Note here that I’m using google’s name server. You can use that or substitute your own “real” name servers. Once you reboot the container and enter it again via the host, you should be able to ping just about any real host (www.google.com, www.yahoo.com or whatever). This gives us a basic NAT running on the host and you just need to increment the IP address (10.10.10.2 in the above case) in the setup of the second container. At this point you should be able to enter either containers and ping something outside.
So the rest of this article describes how to setup a secure reverse proxy using apache on the proxmox host (aaa.bbb.ccc.ddd). This way you can just point arbitrary DNS names at aaa.bbb.ccc.ddd and choose (via apache config) which one of your containers will answer the call. You can even get fancy and have multiple hostnames proxied to the same container and do standard “Name based” virtual hosting inside the container. I will just show the one-to-one proxied connection here. Start by installing apache on the host (apt-get install apache). First we need to activate the proxy module. If you don’t have time to finish this entire procedure DO NOT CONTINUE. Literally in the time it takes to install and configure the proxy, script kiddies will hit your site and use you as a proxy to attack other sites. DO THE PROXY INSTALL AND CONFIG/SECURING PROCEDURE IN ONE SHOT.
Assuming apache is installed go to http://aaa.bbb.ccc.ddd and ensure you’re getting the apache “hello” screen. Now you can enable the three modules needed by issuing the following:
a2enmod proxy
a2enmod proxy_http
a2enmod headers
Once that’s done you need to make some changes to your proxmox hosts default apache config which is in /etc/apache2/sites-available/default. For the sake of completeness I’ve included my entire file here. Compare it to yours and modify accordingly:
# IMPORTANT: YOU NEED THIS
LoadFile /usr/lib/x86_64-linux-gnu/libxml2.so.2

<VirtualHost *:80>
	ServerAdmin webmaster@localhost

	DocumentRoot /var/www
	<Directory />
		Options FollowSymLinks
		AllowOverride None
	</Directory>
	<Directory /var/www/>
		Options Indexes FollowSymLinks MultiViews
		AllowOverride None
		Order allow,deny
		allow from all
	</Directory>

	ErrorLog ${APACHE_LOG_DIR}/error.log

	CustomLog ${APACHE_LOG_DIR}/access.log combined

	# IMPORTANT: YOU NEED THIS
	ProxyRequests Off
	# Block all requests
	<Proxy *>
	  Order deny,allow
	  Deny from all
	</Proxy>

</VirtualHost>

<VirtualHost *:80>
	ServerName hosta.domain.ca
	RequestHeader set hosta.domain.ca Accept-Encoding
	ProxyPreserveHost On
	ProxyPass / http://10.10.10.2/
	ProxyPassReverse / http://10.10.10.2/
	# IMPORTANT: YOU NEED THIS
	<Proxy *>
	    Order deny,allow
	    Allow from all
	</Proxy>
</VirtualHost>
<VirtualHost *:80>
	ServerName hostb.domain.ca
	RequestHeader set hostb.domain.ca Accept-Encoding
	ProxyPreserveHost On
	ProxyPass / http://10.10.10.3/
	ProxyPassReverse / http://10.10.10.3/
	# IMPORTANT: YOU NEED THIS
	<Proxy *>
	    Order deny,allow
	    Allow from all
	</Proxy>
</VirtualHost>
Pay particular attention to parts that have the comment (# IMPORTANT: YOU NEED THIS)……Guess what…..YOU NEED THIS. The first one loads libxml2 which is needed. The second block of code makes sure you are in reverse proxy mode (not in forward proxy) and makes sure the main apache instance can’t be used for proxing. The third and fourth block enable reverse proxy for a particular virtual host name. Now we need to reload apache on our proxmox host and do some testing. Reload apache with (service apache2 reload) and for sanity sake change the index.html file in both containers (under /var/www/index.html) to reflect hosta and hostb. I’ve basically just added the words hosta and hostb to the html file. Register hosta.domain.ca and hostb.domain.ca as “A” fields in your DNS and point them at the IP address of the proxmox host (aaa.bbb.ccc.ddd).
If everything is working properly you should be able to use your browser and point at http://hosta.domain.ca and get the index.html page specific to that container and the same for hostb. At this point you should be more or less good to go. If you need more containers addressable from internet, just keep adding this block of code to the proxmox hosts /etc/apache2/sites-available/default and change the hostname and increment the private IP addresses:
<VirtualHost *:80>
	ServerName hostc.domain.ca
	RequestHeader set hostc.domain.ca Accept-Encoding
	ProxyPreserveHost On
	ProxyPass / http://10.10.10.4/
	ProxyPassReverse / http://10.10.10.4/
	# IMPORTANT: YOU NEED THIS
	<Proxy *>
	    Order deny,allow
	    Allow from all
	</Proxy>
</VirtualHost>
Optionally you can now go back and add a couple more ufw rules to only allow access from a particular IP address space (in my case the university network 141.117.0.0/16)
ufw allow proto tcp from 141.117.0.0/16 to any port 80
ufw deny proto tcp from any to any port 80
Again with this setup — since we’re preserving the request header and are passing it through the proxy back and forth — you can have hostd, hoste, hostf, all point to the same private IP address in the proxy and do a named virtual serving on the apache instance in the particular container, just like a standard named virtual host based setup. Hope this helps…..
6 responses to “Proxmox VPS for web development recipe….”
Thanks for this tutorial, it works perfectly with HTTP 80, and https 443. However, how can I point domain to other ports such as ssh (22) or LDAP (389, 636) and so on?
Hi Osama,
It’s a web proxy only……(ie: http protocol)……so ssh and other stuff will not work. Still working on ssh proxy……will update once I figure out something that works.
TTYL
Many
Hi,
Thanks for the excellent tutorial. It has got me up and running perfectly.
Just in case it helps anyone else, for Debian 6.0.9 (squeeze) I had to change the line in /etc/apache2/sites-available/default from
LoadFile /usr/lib/x86_64-linux-gnu/libxml2.so.2
to
LoadFile /usr/lib64/libxml2.so.2
Regarding the SSH proxy, I followed the guide here http://servernetworktech.com/2012/12/proxmox-and-using-nat-with-a-virtual-machine/ with a few edits and it seems to be working.
I added the following lines to /etc/network/interfaces on the proxmox host:
post-up iptables -t nat -A PREROUTING -i eth0 -p tcp –dport 1022 -j DNAT –to 10.10.10.2:22
post-down iptables -t nat -D PREROUTING -i eth0 -p tcp –dport 1022 -j DNAT –to 10.10.10.2:22
It seems to work but I’m at the very limit of my understanding here YMMV.
Cheers,
James
Hi James,
Yeah…..heck, didn’t even think of that…..I guess you could use iptables to bounce (proxy) the connection…..And I guess you could use different ports on the outside (host) to get to specific containers.
Thanks,
TTYL
Many
Thanks Many,
Very promising – I have proxmox running in virtualbox on my Mac Mini at home: I’ll give this a go and see if I can expose my containers to outside DNS subdomains.
It’d be nice of there was a way to script the addition of containers to the DNS masquerade rather than having to manually edit all these files. This is because I use a devops/chef approach to configure each box do everything else is automated.
I’m also based in Toronto – do you get out to meetups? A proxmox meetup could be interesting!
Best, Martin
Hey Martin,
Glad it was of use. Yeah I’m tempted to spend the time to write some shell scripts or something to do the job automagically……maybe someday. No, I’m not really active in the meetups groups, but yes a proxmox meetup group is a cool idea.
TTYL
Many