I’ve finally got this project to a point were I can do a write up on it. The following hardware is needed:
- Raspberry Pi 512K version (or BeagleBone Black)
- Logitech C920 Webcam
- 16 GB micro SDHC card (can probably do it on 8GB too)
- Wireless dongle supported by linux (I’m using a TrendNet TEW-645UB which was pretty much plug and play)
The goal of this project is to get the following installed and configured:
- CRTMP streaming server
- C920 install and config (v4l2), ffmpeg installation, boneCV installation from Derek Molloy’s site
- configuring ddclient for dynamic DNS (optional)
- putting it all together and creating a webpage with embedded JWplayer to view the stream
UPDATE: Sound works now on BeagleBone Black. On Raspberry you will run into alsa buffer xruns. See below for updated streamVideoRTSP script.
What I still need to figure out is the sound off the camera. At the moment I got buttery smooth 1080P video off the Pi (on wired or wireless connection) running at 5Mb/s but the sound is yet to come.
0) Preparation:
So to prepare you need to get linux installed on your Pi or BBB (BeagleBone Black). I used the latest raspbian for the PI and BeageBone Black Ubuntu Raring 13.04 for BBB. Get it installed onto your SD card. If you use a larger than 8GB SD card you can follow the procedure below to expand the partition from 8GB to whatever your SD card can hold (mine is a 16GB card) (NOTE: almost all commands need to be executed as root so do a sudo -i to start with):
- Use fdisk to see the partition table
root@debian-armhf:/# fdisk /dev/mmcblk0 Command (m for help): p Disk /dev/mmcblk0: 3947 MB, 3947888640 bytes 4 heads, 16 sectors/track, 120480 cylinders, total 7710720 sectors Units = sectors of 1 * 512 = 512 bytes Sector size (logical/physical): 512 bytes / 512 bytes I/O size (minimum/optimal): 512 bytes / 512 bytes Disk identifier: 0x80000000 Device Boot Start End Blocks Id System /dev/mmcblk0p1 * 2048 4095 1024 1 FAT12 /dev/mmcblk0p2 4096 3751935 1873920 83 Linux - In this case we’re expanding partition 2 by first deleting it and without writing the partition table recreating it to span the entire disk (and then writing the new partition table to SD card). This in effect expands the partition. We will expand the filesystem after reboot.
Command (m for help): d Partition number (1-4): 2 Command (m for help): p Disk /dev/mmcblk0: 3947 MB, 3947888640 bytes 4 heads, 16 sectors/track, 120480 cylinders, total 7710720 sectors Units = sectors of 1 * 512 = 512 bytes Sector size (logical/physical): 512 bytes / 512 bytes I/O size (minimum/optimal): 512 bytes / 512 bytes Disk identifier: 0x80000000 Device Boot Start End Blocks Id System /dev/mmcblk0p1 * 2048 4095 1024 1 FAT12 Command (m for help): Command (m for help): n Partition type: p primary (1 primary, 0 extended, 3 free) e extended Select (default p): p Partition number (1-4, default 2): 2 First sector (4096-7710719, default 4096): Using default value 4096 Last sector, +sectors or +size{K,M,G} (4096-7710719, default 7710719): Using default value 7710719 Command (m for help): p Disk /dev/mmcblk0: 3947 MB, 3947888640 bytes 4 heads, 16 sectors/track, 120480 cylinders, total 7710720 sectors Units = sectors of 1 * 512 = 512 bytes Sector size (logical/physical): 512 bytes / 512 bytes I/O size (minimum/optimal): 512 bytes / 512 bytes Disk identifier: 0x80000000 Device Boot Start End Blocks Id System /dev/mmcblk0p1 * 2048 4095 1024 1 FAT12 /dev/mmcblk0p2 4096 7710719 3853312 83 Linux Command (m for help): Command (m for help): w The partition table has been altered! Calling ioctl() to re-read partition table. WARNING: Re-reading the partition table failed with error 16: Device or resource busy. The kernel still uses the old table. The new table will be used at the next reboot or after you run partprobe(8) or kpartx(8) Syncing disks. root@debian-armhf:/# reboot - Once you’re back from reboot we need to expand the filesystem to cover the new partition. Don’t forget to sudo -i to become root.
root@debian-armhf:/# df
Filesystem     1K-blocks   Used Available Use% Mounted on
rootfs           1811704 740184    977824  44% /
/dev/root        1811704 740184    977824  44% /
devtmpfs          253920      0    253920   0% /dev
tmpfs              50816    216     50600   1% /run
tmpfs               5120      0      5120   0% /run/lock
tmpfs             101620      0    101620   0% /run/shm
/dev/mmcblk0p1      1004    474       530  48% /boot/uboot
root@debian-armhf:/#

root@debian-armhf:/# resize2fs /dev/mmcblk0p2
resize2fs 1.42.5 (29-Jul-2012)
Filesystem at /dev/mmcblk0p2 is mounted on /; on-line resizing required
old_desc_blocks = 1, new_desc_blocks = 1
The filesystem on /dev/mmcblk0p2 is now 963328 blocks long.

root@debian-armhf:/# df
Filesystem     1K-blocks   Used Available Use% Mounted on
rootfs           3761680 741096   2851404  21% /
/dev/root        3761680 741096   2851404  21% /
devtmpfs          253920      0    253920   0% /dev
tmpfs              50816    216     50600   1% /run
tmpfs               5120      0      5120   0% /run/lock
tmpfs             101620      0    101620   0% /run/shm
/dev/mmcblk0p1      1004    474       530  48% /boot/uboot
root@debian-armhf:/#
1) CRTMP Server installation
CRTMP server is a streaming media server very similar to wowza. I use this to point ffmpeg at and to get playback on JWplayer. Grab the source code and follow the instructions for installing it on Ubuntu from http://wiki.rtmpd.com/quickbuild. You will need to create your build environment before you start building so do the command below to setup your environment and get the prerequisites installed:
- Install needed packages
root@ubuntu-armhf:/# apt-get install g++ subversion cmake make libssl-dev - Run these two additional commands
root@ubuntu-armhf:/# apt-get install libcurl4-openssl-dev pkg-config root@ubuntu-armhf:/# pkg-config openssl --cflags --libs - Make sure that the last commands output was “-lssl -lcrypto”
- Fetch the latest repo version of CRTMP
cd /opt svn co --username anonymous --password "" https://svn.rtmpd.com/crtmpserver/trunk crtmpserver cd /crtmpserver/builders/cmake/cmake_find_modules - Edit the file Find_openssl.cmake and add the following path to the PATHS section of ssl, crypto and z sections above /usr/lib64 line:
/usr/lib/arm-linux-gnueabihf
- Edit the file Find_pcap.cmake and add the following path to the PATHS section of pcap sections above /usr/lib64 line:
/usr/lib/arm-linux-gnueabihf
- Edit the file Find_dl.cmake and add the following path to the PATHS section of dl sections above /usr/lib64 line:
/usr/lib/arm-linux-gnueabihf
- Edit the file Find_lua.cmake and add the following path to the PATHS section of lua sections above /usr/lib64 line:
/usr/lib/arm-linux-gnueabihf
- Might have to do this if locale is giving you grief (Note: I’ve picked en_CA since I live in Canada, you need to pick the right one for your country/region):
root@ubuntu-armhf:/opt/crtmpserver/builders/cmake/cmake_find_modules# sudo locale-gen en_CA en_CA.UTF-8 Generating locales... en_CA.ISO-8859-1... done en_CA.UTF-8... done Generation complete. root@ubuntu-armhf:/opt/crtmpserver/builders/cmake/cmake_find_modules# dpkg-reconfigure locales Generating locales... en_CA.ISO-8859-1... up-to-date en_CA.UTF-8... up-to-date en_US.UTF-8... done Generation complete. - Start building crtmp
root@ubuntu-armhf:/opt/crtmpserver/builders/cmake# ./run - This process will take a while……go have a couple of coffee’s and/or snacks
Once this process is finished you’ll end up with the executable in /opt/crtmpserver/builders/cmake/crtmpserver, but that’s not how you run it. First you need a config file — you can edit crtmpserver.lua in /opt/crtmpserver/builders/cmake/crtmpserver or save a copy of the original and create a new one with the content from below (I’ve just cleaned up the original a tiny bit).
-- Start of the configuration. This is the only node in the config file.
-- The rest of them are sub-nodes
configuration=
{
	-- if true, the server will run as a daemon.
	-- NOTE: all console appenders will be ignored if this is a daemon
	daemon=false,
	-- the OS's path separator. Used in composing paths
	pathSeparator="/",

	-- this is the place where all the logging facilities are setted up
	-- you can add/remove any number of locations

	logAppenders=
	{
		{
			-- name of the appender. Not too important, but is mandatory
			name="console appender",
			-- type of the appender. We can have the following values:
			-- console, coloredConsole and file
			-- NOTE: console appenders will be ignored if we run the server
			-- as a daemon
			type="coloredConsole",
			-- the level of logging. 6 is the FINEST message, 0 is FATAL message.
			-- The appender will "catch" all the messages below or equal to this level
			-- bigger the level, more messages are recorded
			level=6
		},
		{
			name="file appender",
			type="file",
			level=6,
			-- the file where the log messages are going to land
			fileName="/tmp/crtmpserver",
			--newLineCharacters="\r\n",
			fileHistorySize=10,
			fileLength=1024*256,
			singleLine=true
		}
	},

	-- this node holds all the RTMP applications
	applications=
	{
		-- this is the root directory of all applications
		-- usually this is relative to the binary execuable
		rootDirectory="applications",

		--this is where the applications array starts
		{
			-- The name of the application. It is mandatory and must be unique
			name="appselector",
			-- Short description of the application. Optional
			description="Application for selecting the rest of the applications",

			-- The type of the application. Possible values are:
			-- dynamiclinklibrary - the application is a shared library
			protocol="dynamiclinklibrary",
			-- the complete path to the library. This is optional. If not provided,
			-- the server will try to load the library from here
			-- //lib.{so|dll|dylib}
			-- library="/some/path/to/some/shared/library.so"

			-- Tells the server to validate the clien's handshake before going further.
			-- It is optional, defaulted to true
			validateHandshake=false,
			-- this is the folder from where the current application gets it's content.
			-- It is optional. If not specified, it will be defaulted to:
			-- //mediaFolder
			-- mediaFolder="/some/directory/where/media/files/are/stored"
			-- the application will also be known by that names. It is optional
			--aliases=
			--{
			--	"simpleLive",
			--	"vod",
			--	"live",
			--},
			-- This flag designates the default application. The default application
			-- is responsable of analyzing the "connect" request and distribute
			-- the future connection to the correct application.
			default=true,
			acceptors =
			{
				{
					ip="0.0.0.0",
					port=1935,
					protocol="inboundRtmp"
				},
				{
					ip="0.0.0.0",
					port=8081,
					protocol="inboundRtmps",
					sslKey="server.key",
					sslCert="server.crt"
				},
				{
					ip="0.0.0.0",
					port=8080,
					protocol="inboundRtmpt"
                },
			}
		},
		{
			description="FLV Playback Sample",
			name="flvplayback",
			protocol="dynamiclinklibrary",
			aliases=
			{
				"simpleLive",
				"vod",
				"live",
				"WeeklyQuest",
				"SOSample",
				"oflaDemo",
			},
			acceptors =
			{
				{
					ip="0.0.0.0",
					port=6666,
					protocol="inboundLiveFlv",
					waitForMetadata=true,
				},
				{
					ip="0.0.0.0",
					port=9999,
					protocol="inboundTcpTs"
				},
				{
					ip="0.0.0.0",
					port=10000,
					protocol="inboundUdpTs"
				},
				--[[{
					ip="0.0.0.0",
					port=7654,
					protocol="inboundRawHttpStream",
					crossDomainFile="/tmp/crossdomain.xml"
				}, ]]--
				{
					ip="0.0.0.0",
					port=554,
					protocol="inboundRtsp"
				},
			},
			externalStreams =
			{
				--[[
				{
					uri="rtsp://fms20.mediadirect.ro/live2/realitatea/realitatea",
					localStreamName="rtsp_test",
					forceTcp=true
				},
				{
					uri="rtmp://edge01.fms.dutchview.nl/botr/bunny",
					localStreamName="rtmp_test",
					swfUrl="http://www.example.com/example.swf",
					pageUrl="http://www.example.com/",
					tcUrl="rtmp://edge01.fms.dutchview.nl/botr/bunny", --this one is usually required and should have the same value as the uri
					emulateUserAgent="MAC 10,1,82,76",
				}
				{
                        		uri="rtsp://animalhousenc.dvrdns.org:554/streaming/channels/0",
                        		localStreamName="PoolSide",
                        		forceTcp=true
                		},
               		 	{
                       			 uri="rtsp://animalhousenc.dvrdns.org:556/streaming/channels/0",
                       			 localStreamName="BoneYard",
                       			 forceTcp=true
                		},
                		{
                       			 uri="rtsp://animalhousenc.dvrdns.org:557/streaming/channels/0",
                       			 localStreamName="BigPool",
                       			 forceTcp=true
                		},
               		 	{
                       			 uri="rtsp://192.168.1.186:554/mpeg4/media.amp?videocodec=h264&streamprofile=high",
                       			 localStreamName="nerd",
                       			 forceTcp=true
                		},
               		 	{
                       			 uri="rtsp://192.168.1.190:554/0",
                       			 localStreamName="leopard",
                       			 forceTcp=true
                		}, ]]--
			},
			validateHandshake=false,
			--enableCheckBandwidth=true,
			--[[authentication=
			{
				rtmp={
					type="adobe",
					encoderAgents=
					{
						"FMLE/3.0 (compatible; FMSc/1.0)",
						"My user agent",
					},
					usersFile="users.lua"
				},
				rtsp={
					usersFile="users.lua"
				}
			}, --]]
			mediaStorage = {
			--[[	namedStorage1={
					--this storage contains all properties with their
					--default values. The only mandatory property is
					--mediaFolder
					description="Some storage",
					mediaFolder="/Volumes/Storage/media/",
					metaFolder="/tmp/metadata",
					enableStats=false,
					clientSideBuffer=15,
					keyframeSeek=false,
					seekGranularity=0.1,
				},
				namedStorage2={
					mediaFolder="/Volumes/Storage/media/mp4",
					metaFolder="/tmp/metadata",
					seekGranularity=0.2,
					enableStats=true,
				},
				namedStorage3={
					mediaFolder="/Volumes/Storage/media/flv",
					metaFolder="/tmp/metadata",
				},
				{
					--this one doesn't have a name
					mediaFolder="/Volumes/Storage/media/mp3",
				} --]]
			},
		},
		{
			name="samplefactory",
			description="asdsadasdsa",
			protocol="dynamiclinklibrary",
			aliases=
			{
				"httpOutboundTest"
			},
			acceptors =
			{
				{
					ip="0.0.0.0",
					port=8989,
					protocol="httpEchoProtocol"
				},
				{
					ip="0.0.0.0",
					port=8988,
					protocol="echoProtocol"
				}
			},
			validateHandshake=false,
			--default=true,
		},
		{
			name="vptests",
			description="Variant protocol tests",
			protocol="dynamiclinklibrary",
			aliases=
			{
				"vptests_alias1",
				"vptests_alias2",
				"vptests_alias3",
			},
			acceptors =
			{
				{
					ip="0.0.0.0",
					port=1111,
					protocol="inboundHttpXmlVariant"
				}
			},
			validateHandshake=false,
			--default=true,
		},
		{
			name="admin",
			description="Application for administering",
			protocol="dynamiclinklibrary",
			aliases=
			{
				"admin_alias1",
				"admin_alias2",
				"admin_alias3",
			},
			acceptors =
			{
				{
					ip="0.0.0.0",
					port=1112,
					protocol="inboundJsonCli",
					useLengthPadding=true
				},
			},
			validateHandshake=false,
			--default=true,
		},
		{
			name="proxypublish",
			description="Application for forwarding streams to another RTMP server",
			protocol="dynamiclinklibrary",
			acceptors =
			{
				{
					ip="0.0.0.0",
					port=6665,
					protocol="inboundLiveFlv"
				},
			},
			abortOnConnectError=true,
			targetServers =
			{
				--[[{
					targetUri="rtmp://x.xxxxxxx.fme.ustream.tv/ustreamVideo/xxxxxxx",
					targetStreamName="xxxxxxxxxxxxxxxxxxxxxxxxxxxxxxxx",
					localStreamName="stream1",
					emulateUserAgent="FMLE/3.0 (compatible; FMSc/1.0 http://www.rtmpd.com)"
				}]]--,
				--[[{
					targetUri="rtmp://gigi:spaima@localhost/vod",
					targetStreamType="live", -- (live, record or append)
					emulateUserAgent="My user agent",
					localStreamName="stream1",
					keepAlive=true
				},]]--
			},
			externalStreams =
			{
				--[[{
					uri="rtsp://fms20.mediadirect.ro/live2/realitatea/realitatea",
					localStreamName="stream1",
					forceTcp=true,
					keepAlive=true
				},]]--
			},
			validateHandshake=false,
			--default=true,
		},
		{
			name="stresstest",
			description="Application for stressing a streaming server",
			protocol="dynamiclinklibrary",
			targetServer="localhost",
			targetApp="vod",
			active=false,
			--[[streams =
			{
				"lg00","lg01","lg02","lg03","lg04","lg05","lg06","lg07","lg08",
				"lg09","lg10","lg11","lg12","lg13","lg14","lg15","lg16","lg17",
				"lg18","lg19","lg20","lg21","lg22","lg23","lg24","lg25","lg26",
				"lg27","lg28","lg29","lg30","lg31","lg32","lg33","lg34","lg35",
				"lg36","lg37","lg38","lg39","lg40","lg41","lg42","lg43","lg44",
				"lg45","lg46","lg47","lg48","lg49"
			},]]--
			streams =
			{
				"mp4:lg.mp4"
			},
			numberOfConnections=10,
			randomAccessStreams=false
		},
		--[[{
			name="vmapp",
			description="An application demonstrating the use of virtual machines",
			protocol="dynamiclinklibrary",
			vmType="lua",
			script="flvplayback.lua",
			aliases=
			{
				"flvplayback1",
				"vod1"
			},
			acceptors=
			{
				{
					ip="0.0.0.0",
					port=6544,
					protocol="inboundTcpTs"
				}
			}
		},]]--
		--#INSERTION_MARKER# DO NOT REMOVE THIS. USED BY appscaffold SCRIPT.
	}
}
Once you have this saved (or modified yours to look like this you can go ahead and try to start the server with the following command (NOTE: you need to be in the cmake directory (rather than crtmpserver) and reference the files with partial paths……not sure why…..something to do with cmake base directory).
cd /opt/crtmpserver/builders/cmake/
./crtmpserver/crtmpserver ./crtmpserver/crtmpserver.lua
You should get output similar this this
/crtmpserver/src/crtmpserver.cpp:216 C++ RTMP Media Server (www.rtmpd.com) version 1.1_rc1 build 808 - Gladiator - (built on 2013-09-28T21:19:24.000)
/crtmpserver/src/crtmpserver.cpp:219 OS files descriptors count limits: 4096/4096
/crtmpserver/src/crtmpserver.cpp:221 Initialize I/O handlers manager: epoll without timerfd_XXXX support
/crtmpserver/src/crtmpserver.cpp:224 Configure modules
/crtmpserver/src/crtmpserver.cpp:230 Plug in the default protocol factory
/crtmpserver/src/crtmpserver.cpp:237 Configure factories
/thelib/src/configuration/module.cpp:97 Loaded factory from application samplefactory
/crtmpserver/src/crtmpserver.cpp:243 Configure acceptors
/thelib/src/netio/epoll/iohandlermanager.cpp:120 Handlers count changed: 0->1 IOHT_ACCEPTOR
/thelib/src/netio/epoll/iohandlermanager.cpp:120 Handlers count changed: 1->2 IOHT_ACCEPTOR
/thelib/src/netio/epoll/iohandlermanager.cpp:120 Handlers count changed: 2->3 IOHT_ACCEPTOR
/thelib/src/netio/epoll/iohandlermanager.cpp:120 Handlers count changed: 3->4 IOHT_ACCEPTOR
/thelib/src/netio/epoll/iohandlermanager.cpp:120 Handlers count changed: 4->5 IOHT_ACCEPTOR
/thelib/src/netio/epoll/iohandlermanager.cpp:120 Handlers count changed: 5->6 IOHT_ACCEPTOR
/thelib/src/netio/epoll/iohandlermanager.cpp:120 Handlers count changed: 6->7 IOHT_UDP_CARRIER
/thelib/src/netio/epoll/iohandlermanager.cpp:120 Handlers count changed: 7->8 IOHT_ACCEPTOR
/thelib/src/netio/epoll/iohandlermanager.cpp:120 Handlers count changed: 8->9 IOHT_ACCEPTOR
/thelib/src/netio/epoll/iohandlermanager.cpp:120 Handlers count changed: 9->10 IOHT_ACCEPTOR
/thelib/src/netio/epoll/iohandlermanager.cpp:120 Handlers count changed: 10->11 IOHT_ACCEPTOR
/thelib/src/netio/epoll/iohandlermanager.cpp:120 Handlers count changed: 11->12 IOHT_ACCEPTOR
/crtmpserver/src/crtmpserver.cpp:249 Configure instances
/crtmpserver/src/crtmpserver.cpp:255 Start I/O handlers manager: epoll without timerfd_XXXX support
/crtmpserver/src/crtmpserver.cpp:258 Configure applications
/thelib/src/configuration/module.cpp:177 Application admin instantiated
/thelib/src/configuration/module.cpp:177 Application appselector instantiated
/thelib/src/configuration/module.cpp:177 Application flvplayback instantiated
/thelib/src/netio/epoll/iohandlermanager.cpp:120 Handlers count changed: 12->13 IOHT_TIMER
/thelib/src/configuration/module.cpp:177 Application proxypublish instantiated
/thelib/src/netio/epoll/iohandlermanager.cpp:120 Handlers count changed: 13->14 IOHT_TIMER
/thelib/src/configuration/module.cpp:177 Application samplefactory instantiated
/thelib/src/configuration/module.cpp:177 Application stresstest instantiated
/thelib/src/configuration/module.cpp:177 Application vptests instantiated
/crtmpserver/src/crtmpserver.cpp:264 Install the quit signal
/crtmpserver/src/crtmpserver.cpp:275
+-----------------------------------------------------------------------------+
|                                                                     Services|
+---+---------------+-----+-------------------------+-------------------------+
| c |      ip       | port|   protocol stack name   |     application name    |
+---+---------------+-----+-------------------------+-------------------------+
|tcp|        0.0.0.0| 1112|           inboundJsonCli|                    admin|
+---+---------------+-----+-------------------------+-------------------------+
|tcp|        0.0.0.0| 1935|              inboundRtmp|              appselector|
+---+---------------+-----+-------------------------+-------------------------+
|tcp|        0.0.0.0| 8081|             inboundRtmps|              appselector|
+---+---------------+-----+-------------------------+-------------------------+
|tcp|        0.0.0.0| 8080|             inboundRtmpt|              appselector|
+---+---------------+-----+-------------------------+-------------------------+
|tcp|        0.0.0.0| 6666|           inboundLiveFlv|              flvplayback|
+---+---------------+-----+-------------------------+-------------------------+
|tcp|        0.0.0.0| 9999|             inboundTcpTs|              flvplayback|
+---+---------------+-----+-------------------------+-------------------------+
|udp|        0.0.0.0|10000|             inboundUdpTs|              flvplayback|
+---+---------------+-----+-------------------------+-------------------------+
|tcp|        0.0.0.0|  554|              inboundRtsp|              flvplayback|
+---+---------------+-----+-------------------------+-------------------------+
|tcp|        0.0.0.0| 6665|           inboundLiveFlv|             proxypublish|
+---+---------------+-----+-------------------------+-------------------------+
|tcp|        0.0.0.0| 8989|         httpEchoProtocol|            samplefactory|
+---+---------------+-----+-------------------------+-------------------------+
|tcp|        0.0.0.0| 8988|             echoProtocol|            samplefactory|
+---+---------------+-----+-------------------------+-------------------------+
|tcp|        0.0.0.0| 1111|    inboundHttpXmlVariant|                  vptests|
+---+---------------+-----+-------------------------+-------------------------+
/crtmpserver/src/crtmpserver.cpp:276 GO! GO! GO! (2368)
So far so good……the server is up and running now. You can stop it using Ctrl-C. Lets continue…….
2) C920 install and config (v4l2), ffmpeg installation, boneCV installation from Derek Molloy’s site
Logitec C920 is a really nice camera. Bit on the expensive side, but incredibly capable as we’ll see. I came across a post from Derek Molloy where he talks about UDP streaming h.264 streams off the C920 using a beagle board. That’s when I discovered the magic of this little camera. You see, the camera can provide image data via usb just like any other camera, but it also has the built in capability of producing a 3.5 Mb/s CBR video stream encoded in h.264 in either 640×480, 1280×720 or 1920×1080. I literally jumped out of my seat when I read this and picked one up from the local Best Buy (about $100). So now to get this signal in we need some of the tools that come with v4l (video4linux) utility package. Here is how you go about it:
- First we need to install v4l-utils, ffmpeg and git (need git to grab the code in next step)
apt-get install v4l-utils ffmpeg git - Then we need to pull down some code Derek has modified (and or written) from his git repo
cd /opt git clone git://github.com/derekmolloy/boneCV - Next we need to get into the boneCV directory and recompile Derek’s capture.c program
cd /opt/boneCV gcc -o capture capture.c - Now that we have the fresh capture program maybe we should stop and let me explain. capture.c is a V4L2 video capture example, modified by Derek Molloy for the Logitech C920 camera. He’s added the -F mode for H264 capture and associated help detail, plus an option to allow capture to capture infinite number of frames. Before we continue to the next step it’s worth trying to visualize the chain we’re trying to create. Capture (capture.c) will be called to put the camera in -F mode (1080p h.264 pre-encoded 3.5Mb/s CBR stream over USB) and to continuously pass the frames to a pipe which will feed avconv (a program that comes with ffmpeg) that will not touch the video encoding of the file but will transmit it to a RTSP destination (our crtmp streaming server). Once the stream is runnning we will use JWplayer to view the RTMP stream. The reason I decided to use JWplayer is that various incarnations of VLC say they support RTMP, but their implementation is really bad. For the longest time while using VLC to view the stream (I think it was version 2.1.x and 2.2.x nightly builds) I had freezes and breakups in the stream and I thought the poor Pi was not doing it’s job. NO, it was the player, the Pi (and Beagle Board Black) worked wonderfully. So now we need to modify the streamVideoRTSP file Derek has to look like the following (might want to save the original as .bak or something).
#!/bin/bash
echo "Video Streaming for the Beaglebone - derekmolloy.ie"
echo "Piping the output of capture to avconv"
#1080P mode
v4l2-ctl --set-fmt-video=width=1920,height=1080,pixelformat=1
#720P mode
#v4l2-ctl --set-fmt-video=width=1280,height=720,pixelformat=1

# Pipe the output of capture into avconv/ffmpeg
# capture "-F"   My H264 passthrough mode
#         "-o"   Output the video (to be passed to avconv via pipe)
#         "-c0"  Capture 0 frames, which means infinite frames in my program
# avconv "-i -"  Take the input from the pipe
#        "-vcodec copy" Do not transcode the video

#1080P mode
./capture -F -o -c0|avconv -re -i - -f alsa -ac 2 -i hw:1,0 -strict experimental -threads 0 -acodec aac -ab 64k -ac 2 -vcodec copy -f  rtsp -metadata title=teststream rtsp://127.0.01:554/live
#720P mode
#./capture -f -o -c0|avconv -re -i - -f alsa -ac 2 -i hw:1,0 -strict experimental -threads 0 -acodec aac -ab 64k -ac 2 -vcodec copy -f  rtsp -metadata title=teststream rtsp://127.0.01:554/live
3) Configuring ddclient for dynamic DNS (optional)
This is totally optional and has no effect on the final product (makes life a bit simpler). I’m just going to provide the bare minimum explanation and my config. This process is very dependant on your DNS provider (if you have one), my example config is for my provider easydns.com. Your mileage will vary :-).
- First we need to get ddclient program installed (this is one of dynamic dns tools available in linux)
apt-get install ddclient - Then we need to edit the config file located in /etc called ddclient.conf. Here is mine which is specific for easydns.com. YOU WILL HAVE TO MODIFY THIS TO SUITE YOUR DNS PROVIDER.
# Configuration file for ddclient generated by debconf # # /etc/ddclient.conf # updates internet ip on wired protocol=easydns, # Use this is you want to register the interface ip address (ie: You're not behind a NAT or you don't care) use=if, if=eth0, # Use this is you want to register your external ip address (ie: You're behind a NAT and want to register your outside IP address not the internal 192.168.x.x one) #use=web, web=checkip.dyndns.com/, web-skip='IP Address' server=members.easydns.com, login=easydnsuserid, password='easydnspassword', hostname.domain.com - If you’ve enabled two factor authentication on easyDNS (or maybe even if you have not) there is a token that you’ll need to get called “Dynamic Authentication Token”. You can grab yours under the dynamic records page by enabling “Dynamic Authentication Token” and vieing your code. I will use XXXXXXXXXXXXXXXX as my code in the following example (NOTE: server and password clauses need to be changed):
# Configuration file for ddclient generated by debconf # # /etc/ddclient.conf # updates internet ip on wired protocol=easydns, # Use this is you want to register the interface ip address (ie: You're not behind a NAT or you don't care) use=if, if=eth0, # Use this is you want to register your external ip address (ie: You're behind a NAT and want to register your outside IP address not the internal 192.168.x.x one) #use=web, web=checkip.dyndns.com/, web-skip='IP Address' server=api.cp.easydns.com, login=easydnsuserid, password='XXXXXXXXXXXXXXXX', hostname.domain.com - Once the config is there we can restart the ddclient service
service ddclient restart - If you want to check/test/debug your ddclient config, first stop the daemon that’s running in the backgroud, start it from command line in forground like below
service ddclient stop
ddclient -daemon=0 -debug -verbose -noquiet
4) Putting it all together and creating a webpage with embedded JWplayer to view the stream
So now you need to grab JWplayer (the free version) install it (copy the jwplayer folder) into a folder on your webserver (I copied mine into a folder of my blog server). The main file here is the HTML file that has the specifications for the stream in it. You need to create this to suite your need (ie: if you have dynamic DNS use the DNS name or if you don’t use the IP address of the Pi/BeagleBoard. Your mileage will vary :-).
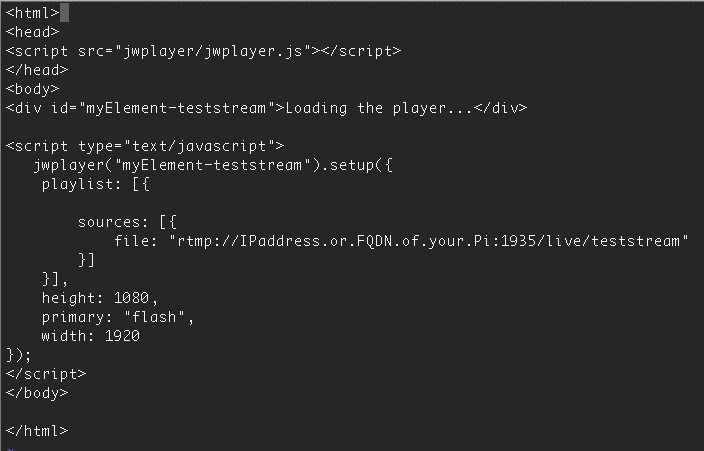
The above code is an example you will need to sustitute your own data to get it to work. We need two ssh windows off the Pi (one to run the crtmpserver and the other to start capturing and feeding it via streamVideoRTSP script. So go ahead start crtmp (see above….we did this as a test in step 1) and in the other window start streamVideoRTSP script. Those two windows should look like this:
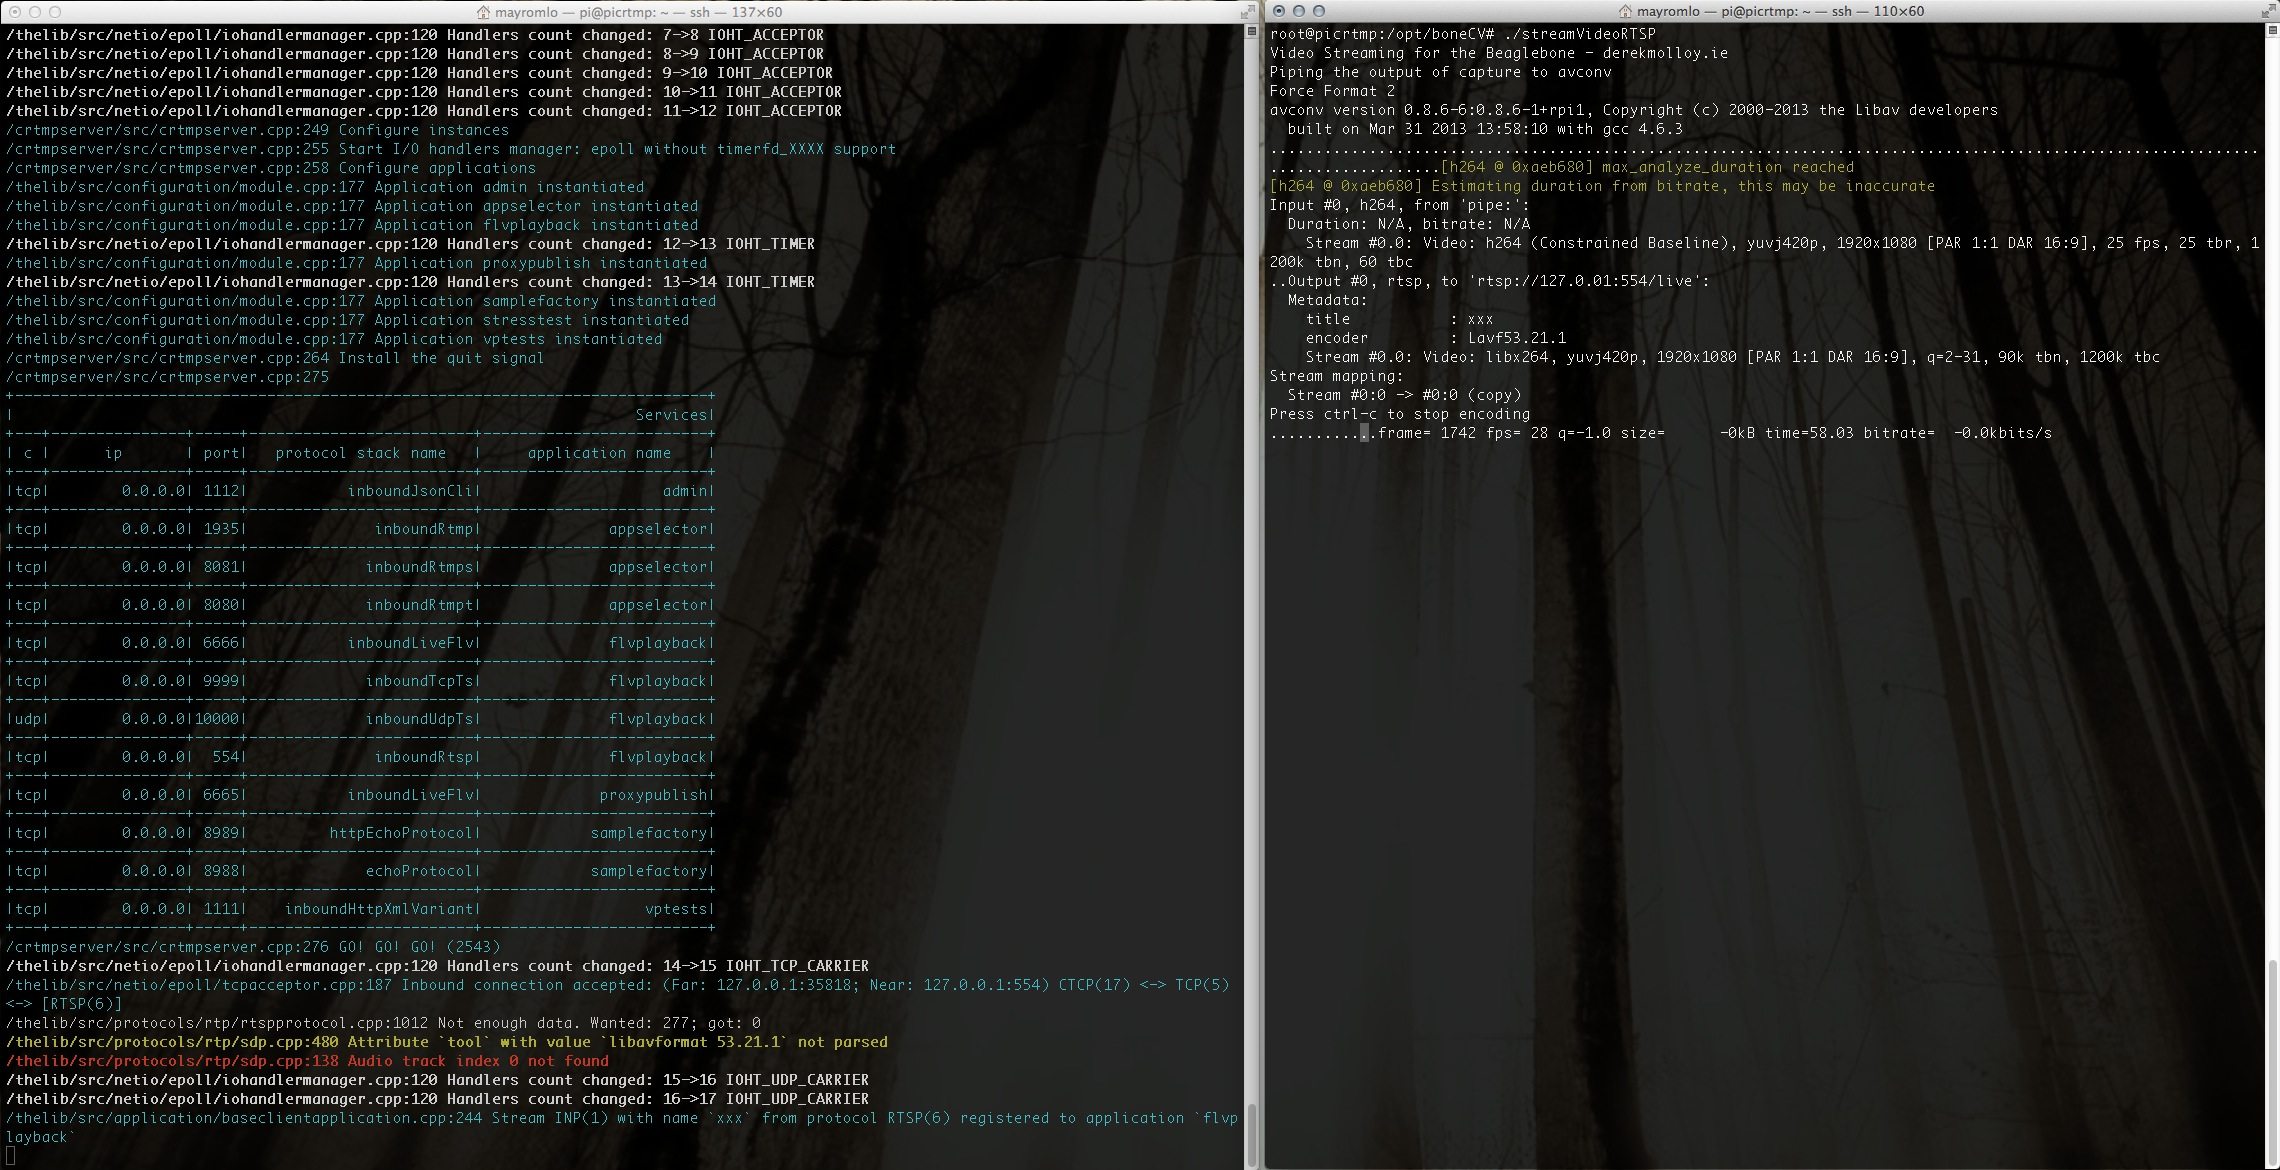
That’s pretty much it. If you now load the html file for jwplayer and press play (assuming you’ve done everything correctly) the stream should start playing in about 4-5 seconds. The encoding delay in the entire chain is about 2-3 seconds, the quality (considering it’s a webcam feeding a $35 computer) is really good and given proper power the Pi can steam this 1080p/30 stream without a issue. Just for the fun of it I also (at the same time) tried to feed the crtmp server (on the pi) a seperate quarter rez HD stream (640×360) encoded by ffmpeg on my desktop and yep, no problems (although the Pi is on medium overclocking settings). These RTMP streams can also be very easily scaled by passing them to larger crtmp installations and/or ustream/wowza for rebroadcast. Below you’ll find a bunch of ffmpeg command line entries I used for this second stream and also a quick (optional) write up on how I got the wireless dongle from Trendnet to work and configured from CLI.
./ffmpeg -re -i /Volumes/Qmultimedia/1217209\(73\).avi -vcodec libx264  -b 500000 -s 640x360 -strict experimental -g 25 -me_method zero -acodec aac -ab 96000 -ar 48000 -ac 2 -vbsf h264_mp4toannexb -f mpegts -metadata title=xxx udp://192.168.1.69:10000?pkt_size=1316
./ffmpeg -re -i /Volumes/Qmultimedia/1217209\(73\).avi -vcodec libx264  -b 500000 -s 640x360 -strict experimental -g 25 -me_method zero -acodec aac -ab 96000 -ar 48000 -ac 2 -f flv rtmp://192.168.1.69:1935/live/xxx
./ffmpeg -re -i /Volumes/Qmultimedia/1217209\(73\).avi -vcodec libx264  -b 500000 -s 640x360 -strict experimental -g 25 -me_method zero -acodec aac -ab 96000 -ar 48000 -ac 2 -f rtsp -metadata title=xxx rtsp://192.168.1.69:554/live
For wireless I’m using a TrendNet TEW-645UB which is directly supported under linux. Initially I used wpa_cli to get things configured and once the system was configured I massaged the files a bit. Here is a log of the whole thing:
root@picrtmp:~# lsusb
Bus 001 Device 002: ID 0424:9512 Standard Microsystems Corp.
Bus 001 Device 001: ID 1d6b:0002 Linux Foundation 2.0 root hub
Bus 001 Device 003: ID 0424:ec00 Standard Microsystems Corp.
Bus 001 Device 004: ID 157e:3013 TRENDnet
Bus 001 Device 006: ID 046d:082d Logitech, Inc.
root@picrtmp:~# wpa_cli
wpa_cli v1.0
Copyright (c) 2004-2012, Jouni Malinen <j@w1.fi> and contributors

This program is free software. You can distribute it and/or modify it
under the terms of the GNU General Public License version 2.

Alternatively, this software may be distributed under the terms of the
BSD license. See README and COPYING for more details.

Selected interface 'wlan0'

Interactive mode

> scan
OK
CTRL-EVENT-SCAN-RESULTS
> scan_results
bssid / frequency / signal level / flags / ssid
7c:d1:c3:zz:yy:xx	2411	-50	[WPA2-PSK-CCMP][ESS]	Nerdlogger
7c:d1:c3:zz:yy:xx	2412	-51	[WPA2-PSK-CCMP][ESS]	MaNiAc 2Ghz
8c:7c:b5:zz:yy:xx	2437	-64	[WPA-PSK-CCMP][ESS]	PS3-3313551
> add_network
0
> set_network 0 ssid "Nerdlogger"
OK
> set_network 0 psk "supersecretpassword"
OK
> enable_network 0
OK
> add_network
1
> set_network 1 ssid "MaNiAc 2Ghz"
OK
> set_network 1 psk "supersecretpassword"
OK
> enable_network 1
OK
> save_config
OK
> quit
>
root@picrtmp:~# iwconfig
wlan0     IEEE 802.11bgn  ESSID:"MaNiAc 2Ghz"
          Mode:Managed  Frequency:2.412 GHz  Access Point: 7C:D1:C3:CA:0F:7A
          Bit Rate=43.3 Mb/s   Tx-Power=20 dBm
          Retry  long limit:7   RTS thr:off   Fragment thr:off
          Encryption key:off
          Power Management:on
          Link Quality=59/70  Signal level=-51 dBm
          Rx invalid nwid:0  Rx invalid crypt:0  Rx invalid frag:0
          Tx excessive retries:0  Invalid misc:1   Missed beacon:0

lo        no wireless extensions.

eth0      no wireless extensions.

root@picrtmp:~# ifconfig
eth0      Link encap:Ethernet  HWaddr b8:27:eb:37:a6:b3
          inet addr:192.168.1.189  Bcast:192.168.1.255  Mask:255.255.255.0
          UP BROADCAST RUNNING MULTICAST  MTU:1500  Metric:1
          RX packets:10397 errors:0 dropped:1 overruns:0 frame:0
          TX packets:5361 errors:0 dropped:0 overruns:0 carrier:0
          collisions:0 txqueuelen:1000
          RX bytes:726543 (709.5 KiB)  TX bytes:918179 (896.6 KiB)

lo        Link encap:Local Loopback
          inet addr:127.0.0.1  Mask:255.0.0.0
          UP LOOPBACK RUNNING  MTU:16436  Metric:1
          RX packets:0 errors:0 dropped:0 overruns:0 frame:0
          TX packets:0 errors:0 dropped:0 overruns:0 carrier:0
          collisions:0 txqueuelen:0
          RX bytes:0 (0.0 B)  TX bytes:0 (0.0 B)

wlan0     Link encap:Ethernet  HWaddr 00:14:d1:cc:16:d2
          inet addr:192.168.1.69  Bcast:192.168.1.255  Mask:255.255.255.0
          UP BROADCAST RUNNING MULTICAST  MTU:1500  Metric:1
          RX packets:1389 errors:0 dropped:41 overruns:0 frame:0
          TX packets:36 errors:0 dropped:0 overruns:0 carrier:0
          collisions:0 txqueuelen:1000
          RX bytes:466517 (455.5 KiB)  TX bytes:4773 (4.6 KiB)

root@picrtmp:~# cat /etc/network/interfaces
auto lo

iface lo inet loopback
auto eth0
iface eth0 inet dhcp

auto wlan0
allow-hotplug wlan0
iface wlan0 inet manual
	wpa-driver wext
	wpa-roam /etc/wpa_supplicant/wpa_supplicant.conf

iface default inet dhcp

iface work inet dhcp

iface home inet static
	address 192.168.1.69
	netmask 255.255.255.0
	network 192.168.1.0
	broadcast 192.168.1.255
	gateway 192.168.1.1
	dns-nameservers 192.168.1.1

root@picrtmp:~# cat /etc/wpa_supplicant/wpa_supplicant.conf
ctrl_interface=DIR=/var/run/wpa_supplicant GROUP=netdev
update_config=1

network={
	ssid="Nerdlogger"
	psk="supersecretpassword"
	id_str="work"
}

network={
	ssid="MaNiAc 2Ghz"
	psk="supersecretpassword"
	id_str="home"
}

root@picrtmp:~#
24 responses to “Streaming 1080P video using Raspberry Pi (or BeagleBone Black)”
Thanks for the guide. It’s exactly what I’m after, but I’ve got a problem with ffmpeg. I’ve done exactly as you’ve written, but for some reason the frame rate gradually drops to around 15fps, and JW player stops every few seconds and then speeds up because of it. Did you encounter this at all?
Hello Many,
Thanks for this very helpful post and guidance on setting up a hi-rez vid stream. I’m currently working on a prototype for the BBB, and audio + video is crucial in my use case. Have you had an opportunity, yet, to test audio under your scenario?
Thanks again for a great post.
Charles Hamilton
root@ubuntu-armhf:/opt/crtmpserver/builders/cmake# cd /opt/crtmpserver
root@ubuntu-armhf:/opt/crtmpserver# ./run
i do not found the ./run file in the location the command says could u help i would be very thankfull
Hi Devesh,
Yeah, my mistake……just run ./run from /opt/crtmpserver/builders/cmake directory (i.e.: forget the cd /opt/crtmpserver). I’ve edited the post to reflect this as well……thanks, nice catch :-)
TTYL
Many
Hi RealtimeX,
No, I can’t say I have……mine seems to run 99.9 percent of the time at 30 frames……once in a blue moon I get the missing packet thing where the video playback speeds up to catch up, but extremely rare…..I’ve had the thing running for almost two weeks at one point and nothing like you describe…….you’re using a C920 right?…..and you’re not viewing on the encoder at the same time as encoding?
Hey, this is awesome. THank you so much for your tutorial it has helped me immensely. I have a few questions to ask you:
1) I keep getting an error when I try to run RTSP:
“[tcp @ 0x47f20] TCP conection to 127.0.01:443 failed: Connection refused”
and
“Could not write header for output file #0 (incorrect codec parameters ?)”
What could I be doing wrong? I tried to use the original streamVideoRTSP file as well with the same issues. Strangely RTP works fine and so does all the other files when I run them. Obviously I want a live feed so this is a pitfall.
2) I have hosting from justhost.com… if I created a static IP instead of using that dynamic system, is that ok? I want to put the camera in a koi fish pond… it be there for months on end without being touched.
Thanks,
Craiggles.
Hello Many.
I am an installation artist living in melbourne australia, and i am working on a large public artwork that i want to incorporate live video streaming to multiple viewers. i have seen your project from 09 Nov 13 Streaming 1080P video using Raspberry Pi (or BeagleBone Black) and think that this may be the perfect solution. would you be open to chatting with me a little to see if this is the right way forward for me.
love your work.
best david
Hi David,
Sorry about the delay…..been a bit busy……I can chat with you about your project if you like. Just contact me via email (mayromlo%ryerson.ca). replace % with @ :-).
Hi Craiggles,
I think you’re running apache on port 443. That’s why you’re getting that error. Might want to turn it off and test again. About the static IP…..yeah that’s preferred, I just use the Dynamic IP naming since I move the machine around a lot and need to be able to find it without having to plugin a monitor and keyboard.
Good luck,
Many
[…] habe ich mich über das “capture”-Tool gewundert dessen Ursprung unerwähnt bleibt. In dieser Anleitung bin ich dann wieder auf ein “capture”-Tool gestoßen – diesmal mit […]
I’m curious, will this work well being displayed on a mobile browser, in particular iOS? Before I give this a shot, I’d love to know about some results. Thanks!
Yes it will, if you use a streaming server that supports segmented streaming (HLS). As far as I know crtmp does not support this feature, but streaming servers like Wowza do……same procedure except you send the stream to wowza instead of crtmp. And before you ask, no you can not run wowza on the pi (or BBB). There is a way to do HLS streaming through nginx web server but that’s beyond the scope of this article. It you do a search for “HLS rtmp streaming nginx raspberry pi” on google there are people who have done this.
Anyone experiencing serious packet loss problems ? My video get distorted when something moves. Any pointers?
Also, video capture is insanely fast playback. 2X more than it is supposed to be. Would that be a fps issue?
Hi, thanks for such a great write up!
I was able to get the stream to work, just over LAN for now, but I get awful artifacts in the video whenever there’s movement. My firmware is fully up to date, I’m running the most recent version of Raspbian, and I’m running this on a Raspberry Pi model B (not Raspberry Pi 2). Also, I viewed the stream from another computer, not the pi, and observed the choppiness there.
Do you know what could be causing it?
Thanks again!
Hi Ethan,
Couple of things you want to check and make sure:
1) When you say “tried it on Lan”, you mean the Pi was NOT using wireless, right? Wireless is really iffy.
2) I’m hoping that you were not trying to watch the stream on the same pi as the one that was streaming it. The older Pi (not sure about newer Pi+) simply can’t handle that.
3) That you had a good (read: more than 5V@1amp) capable power supply powering the Pi. USB stuff on the Pi is notorious for being finicky with a lower rated power supply or USB hubs for that matter as well.
4) You were running the streaming Pi in command line mode (NOT graphical desktop mode)…….As light as the graphical environment is, it sucks enough CPU cycles to screw up the stream. Again on a Pi+ this might not be a issue.
5) You are using a Logitech C920 and it’s pretty much the only thing plugged into USB. I think I had a keyboard plugged in as well. But most of the time I was just ssh’d into the Pi with the camera being the only USB device.
If you’ve taken care of the above and it’s still choppy, I would maybe overclock the Pi just a tiny bit (ie: just ONE level to 800Mhz. I think they call it moderate or lite or something like that in the menu). That’s about all I got in terms of suggestions……
I’ve had the stream running for 6-7 days at a time pointing at a TV screen (moderate movement) and it’s performed quite nice. There was a memory leak that would grind the system to a halt after about 5-6 days or so……not sure if that’s been solved.
Good luck,
Many
Hi Many,
I was using a wireless dongle with the pi. I hooked it up to my router and the stream works perfectly!
Thanks for your help!
-Ethan
Hi Ethan,
Glad you got it working……yeah wireless is very iffy :-). I’ve found out that it works better with Pi2 and a wifi dongle with external antenna like (http://www.adafruit.com/products/1030). Even then it’s kinda iffy.
Anyways, glad you got it working…..
TTYL
Many
Hi Many,
Thanks for your excellent tutorial. I’m about to start a project which is image processing on Beaglebone Black. I’d like to use a Logitech C920 webcam but, I see Logitech only supports this webcam for Windows.
Have you ever had any troubles?
Thanks
Baris
Hey Baris,
Sorry about the delay, I was at a conference and had little access to email…..The C920 is a nice camera and under linux is supported by V4L2 and UVC. Under V4L2 it only provides 30fps at 1080p (amongst other combinations) with applications that supports H.264 directly, and can pull in the H.264 stream directly from the camera. The C920 does on-board H.264 compression at fixed 5Mb/s, but most applications don’t support pulling the compressed stream straight from the camera; instead, they have to decompress then re-compress the stream, dropping the frame rate. Under UVC (i.e: YUV/YUY mode) support for C920 is there, but it’s not very good for higher resolutions (i.e: 1080p). You’ll not get full 30 fps using UVC.
TTYL
Many
Thanks so much for this tutorial!
I’ve been trying to get this project working for quite some time, but I am stuck.
Here are the results I get from running the “./streamVideoRTSP” script:
Non-monotonous DTS in output stream 0:1; previous: 18273, current: 15210; changing to 18274. This may result in incorrect timestamps in the output file.
[rtp @ 0xaef200] Application provided invalid, non monotonically increasing dts to muxer in stream 0: 6497 >= 6497
av_interleaved_write_frame(): Invalid argument
Any suggestions on where I should begin troubleshooting?
Thanks!
Hey Jared,
Okay, first I would suggest you check that your streamVideoRTSP file looks similar to the one in the article. The Error you’re getting has something to do with timing and it’s coming from avconv program — called from streamVideoRTSP. The thing that bothers me is that it’s a rtp “fault” except that the article example uses rtsp protocol…..So make sure you’ve changed the file contents appropriately. I was also going to suggest that you use a 2A+ power supply, but I highly doubt that that’s the problem. I really think it’s the call to avconv in streamVideoRTSP that’s messed up somehow. Can you confirm that it matches (more or less) the example on the website?
TTYL
Many
Hello Manny,
Thanks for this tut.
I am stuck similarly as Jarad.
Here are the results from running the “./streamVideoRTSP” script:
Non-monotonous DTS in output stream 0:1; previous: -26196, current: -29610; changing to -26195. This may result in incorrect timestamps in the output file.
[rtp @ 0x10511a0] Application provided invalid, non monotonically increasing dts to muxer in stream 0: -9314 >= -9314
av_interleaved_write_frame(): Invalid argument
I am running a 2+amp power supply, any suggestions?
Cheers
I have the C920 and beaglebone black. When running the streamVideoRTSP I get the errors
[tcp @ 0x31b00] TCP connection to 127.0.01:555 failed: Connection refused
and later
Could not write header for output file #0 (incorrect codec parameters ?)
I see someone else had this error too. I do not think I have anything at port 555 (tried it with 554 also). I’m using the 1080p version as the 720p version does not start (error: .pipe:: Invalid data found when processing input).
CRTMP server was installed from APT (debian) and starts fine without errors. I also replaced the config with yours. ffmpeg was also installed. Any ideas what is wrong?